Fleet Operations
| Lines of Code | 5939 |
| Technical name | viin_fleet_planning |
| License | OPL-1 |
| Website | https://viindoo.com/apps/app/17.0/viin_fleet_planning |
| Read description for | v 10.0 v 11.0 v 12.0 v 13.0 v 14.0 v 15.0 v 16.0 |
| Required Apps | Discuss (mail) Employees (hr) Fleet (fleet) |
| Included Dependencies | Fleet Drivers Management Fleet Booking & Trip Management Fleet Loading Capacity Employee Documents Viindoo Unified Routing Framework QR Code Mixin Viindoo Base Advanced HR Management Viin Fleet API Request Logger Partner Working Calendar |
| Extensions | Fleet Pickup and Delivery Planning Fleet Route Accounting - Cost by Geographical Route Fleet Planning - Driver Expense Reimbursement Viin Fleet Planning Map |
Fleet Operations
Plan every route, dispatch every vehicle, and guide every driver from one cockpit.
Fleet Operations turns a pile of unassigned bookings into optimized routes in a single screen, then walks your drivers through each stop on their phone — so your dispatch desk and your drivers finally work from the same plan.
Powering Your Business Growth.
Extends viin_fleet_booking -
see its documentation.
Key Features
Dispatch Board with a built-in VRP auto-planner
A drag-and-drop dispatch cockpit that combines an unassigned-bookings panel, a trip board grouped by vehicle, and a server-side OR-Tools optimization engine. Auto-plan the whole board or assign bookings by hand, then batch-confirm the result — all without leaving the screen.
Review before you commit
The optimizer never silently commits a plan. Every auto-planned proposal opens as a review overlay — one route card per vehicle with distance, duration and load-utilization bars — so your dispatcher accepts, adjusts or rejects the routing before a single real trip changes.
“My Trips” driver mobile execution
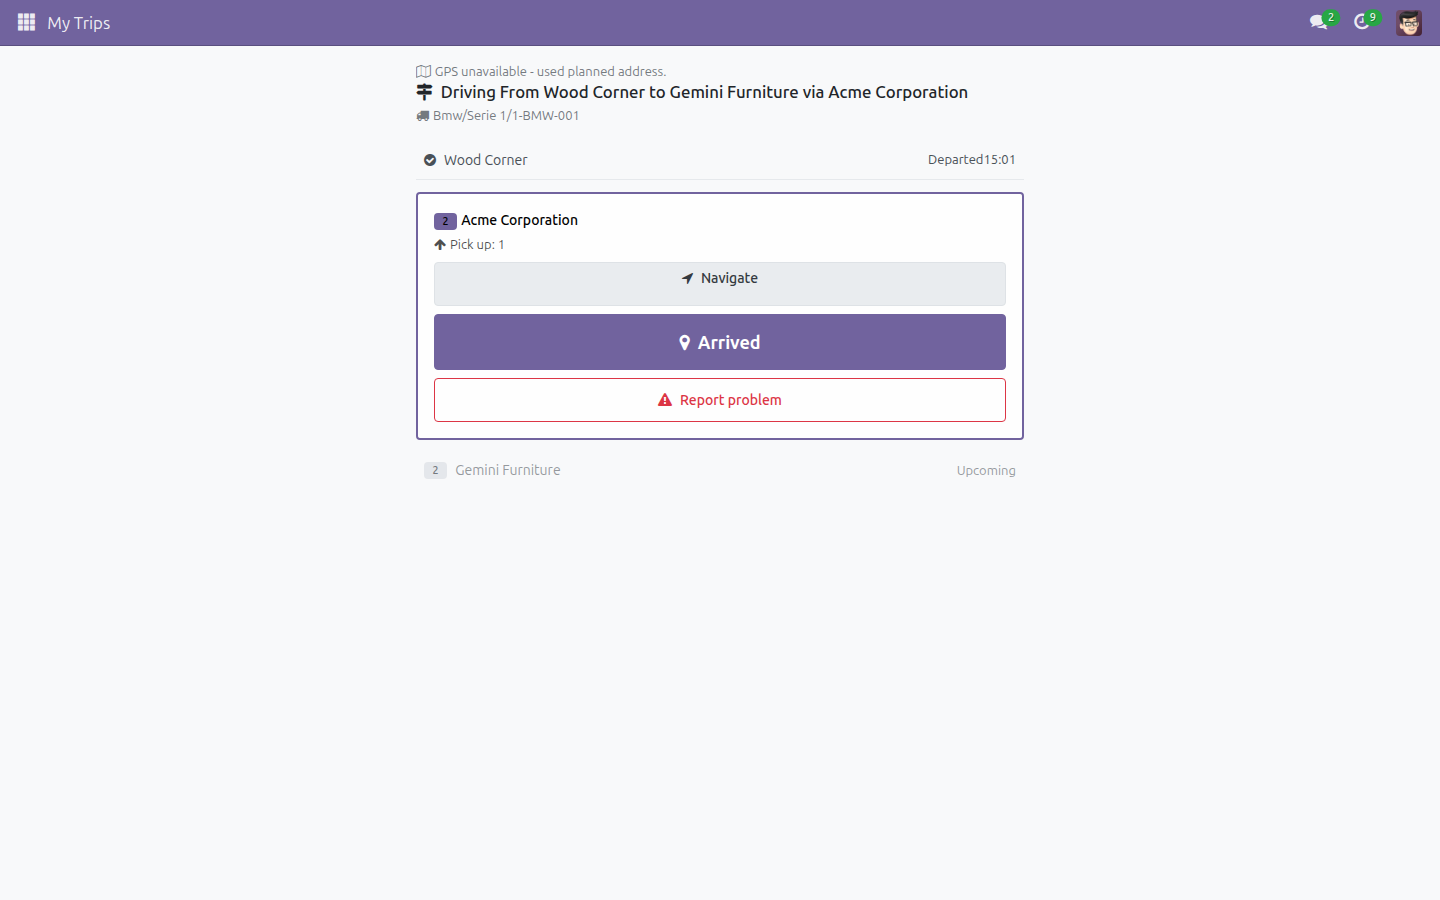
Each driver gets one focused, mobile-first screen showing only their assigned trip. A single adaptive button leads them stop by stop — Arrive, Load, Depart, Deliver, Finish — and GPS is captured on every stamp, so you know where and when each action happened.
One-tap exception reporting
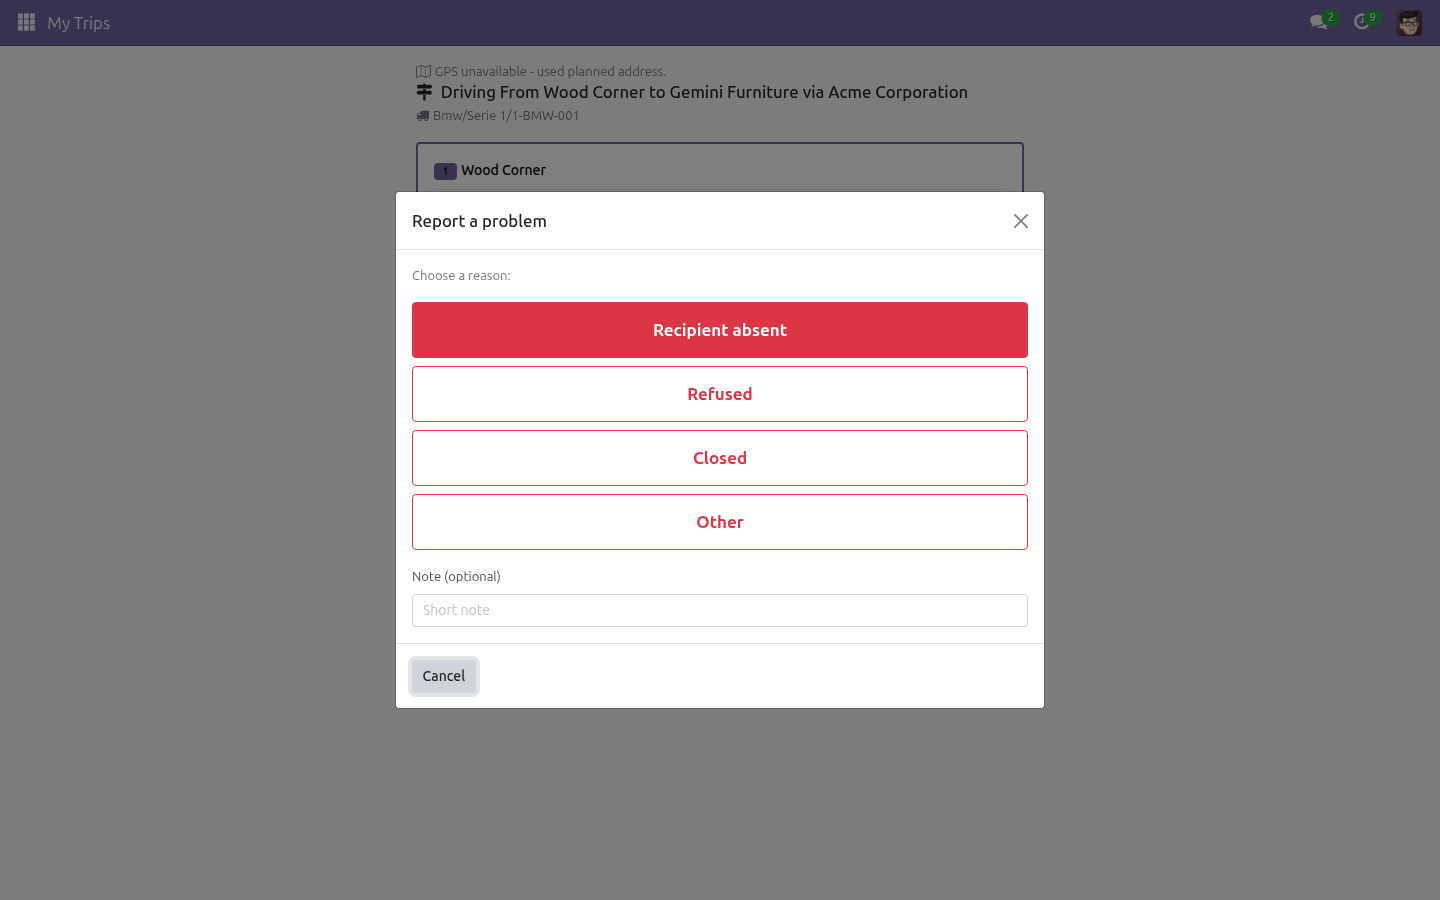
When a stop can’t be completed, the driver taps Report problem and picks a reason — Recipient absent, Refused, Closed or Other — with an optional note. The stop is marked Failed and the next action activates immediately, so a bad stop never stalls the whole trip.
Route-optimized trip planning
Plan a trip from a calendar: pick the vehicle, driver and one or more assistants, attach a reusable Geo-Route, then Optimize Route, Get Distance Matrix and Get Directions to compute per-stop ETA/ETD and per-segment distance and duration before you confirm.
Reusable routes, waypoints and per-vehicle VRP rules
Maintain reusable geo-routes and waypoints as master data, and configure each vehicle’s routing limits — depot end address, working calendar, maximum route duration and default per-stop service time — that bound what the auto-planner is allowed to schedule.
Per-stop and per-route cost tracking
Pin every vehicle cost to the exact trip, route section and waypoint where it was incurred. Instead of one trip-level total, you get a true per-stop and per-route cost breakdown — with a guardrail that blocks a cost from being attached to a stop that isn’t on the trip.
Planned-vs-actual analytics
Completed-trip worklists and the Trip Analysis pivot surface actual vs planned distance, time deviation and fuel efficiency, with route, section and waypoint filters — so managers can see exactly where routes drift from plan.
Benefits
Cut planning time from hours to minutes. One screen replaces spreadsheet juggling: auto-plan the board, review the proposal, batch-confirm — and every affected vehicle’s capacity updates on the spot.
Drivers execute the plan without training. A single adaptive button and four big exception buttons mean a new driver can run a full trip on their phone with no manual, while every timestamp and GPS point flows back automatically.
Never over-load a vehicle. Live capacity bars aggregate each booking’s weight and volume against the vehicle’s limits, so dispatchers catch an over-capacity route before it leaves the depot.
See where reality diverges from the plan. Per-stop timestamps and planned-vs-actual analytics turn every completed trip into evidence you can act on — distance deviation, time deviation and fuel consumption, sliced by route.
Know the true cost of each route. Per-waypoint and per-segment cost attribution reveals which stops and which legs actually cost you money, not just a blended trip total.
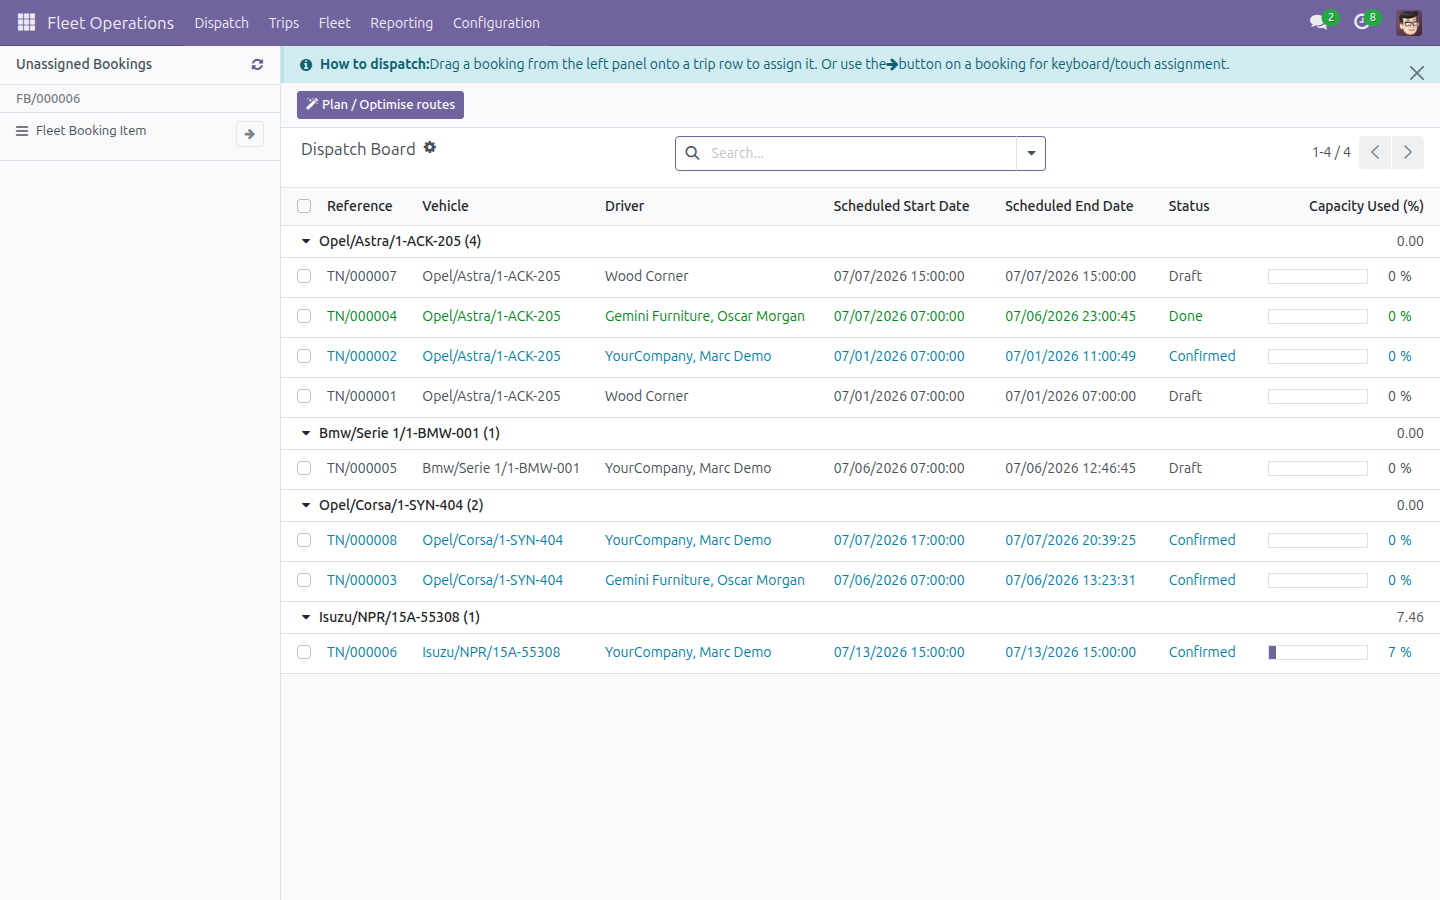
Auto-plan the whole board
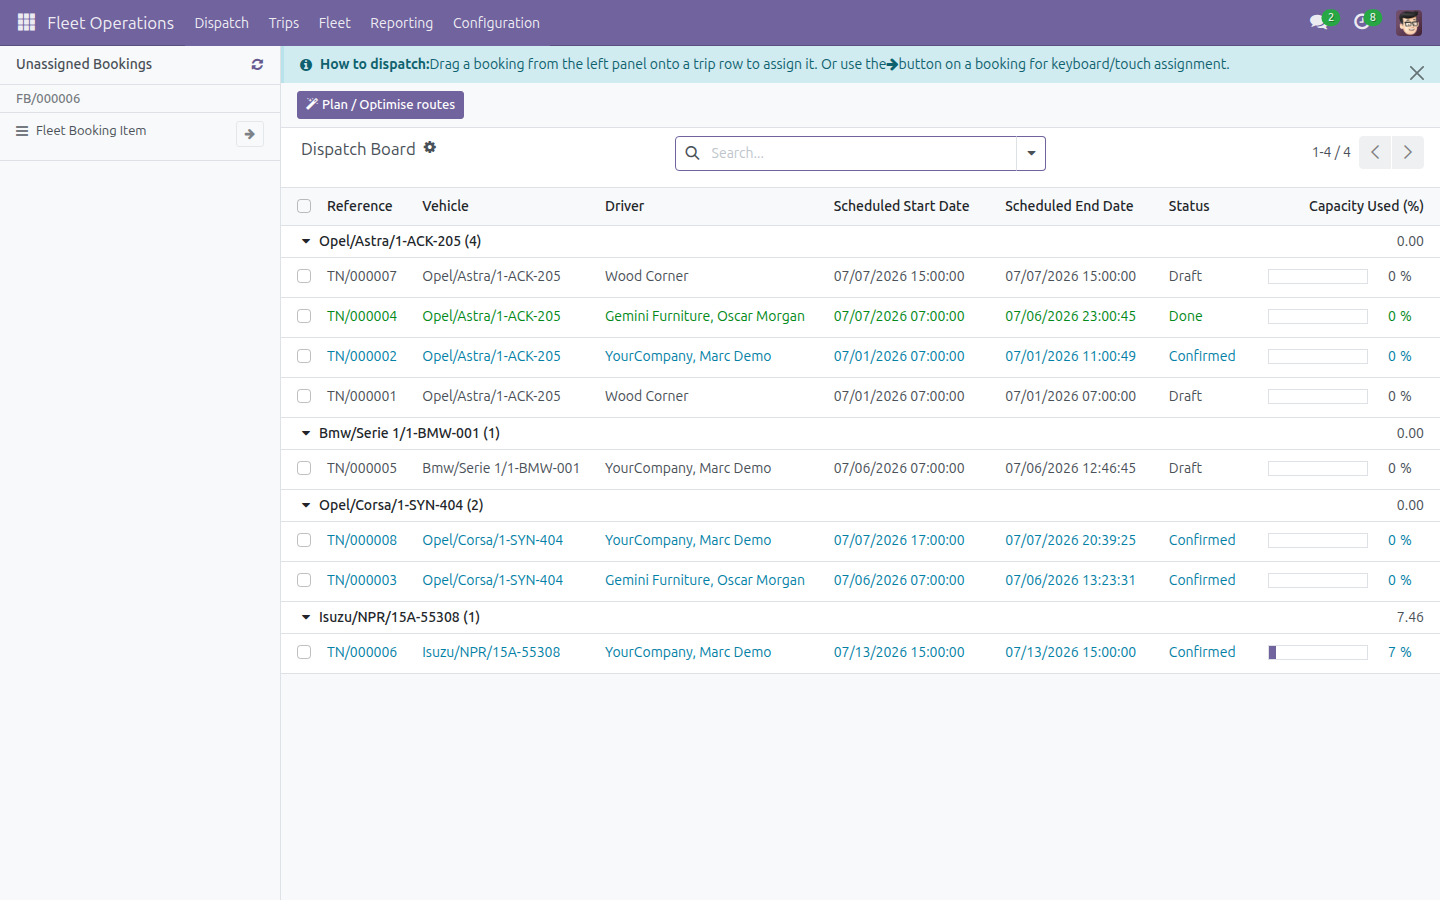
The Dispatch Board: unassigned bookings on the left, vehicle trip board on the right, one click to auto-plan every route.
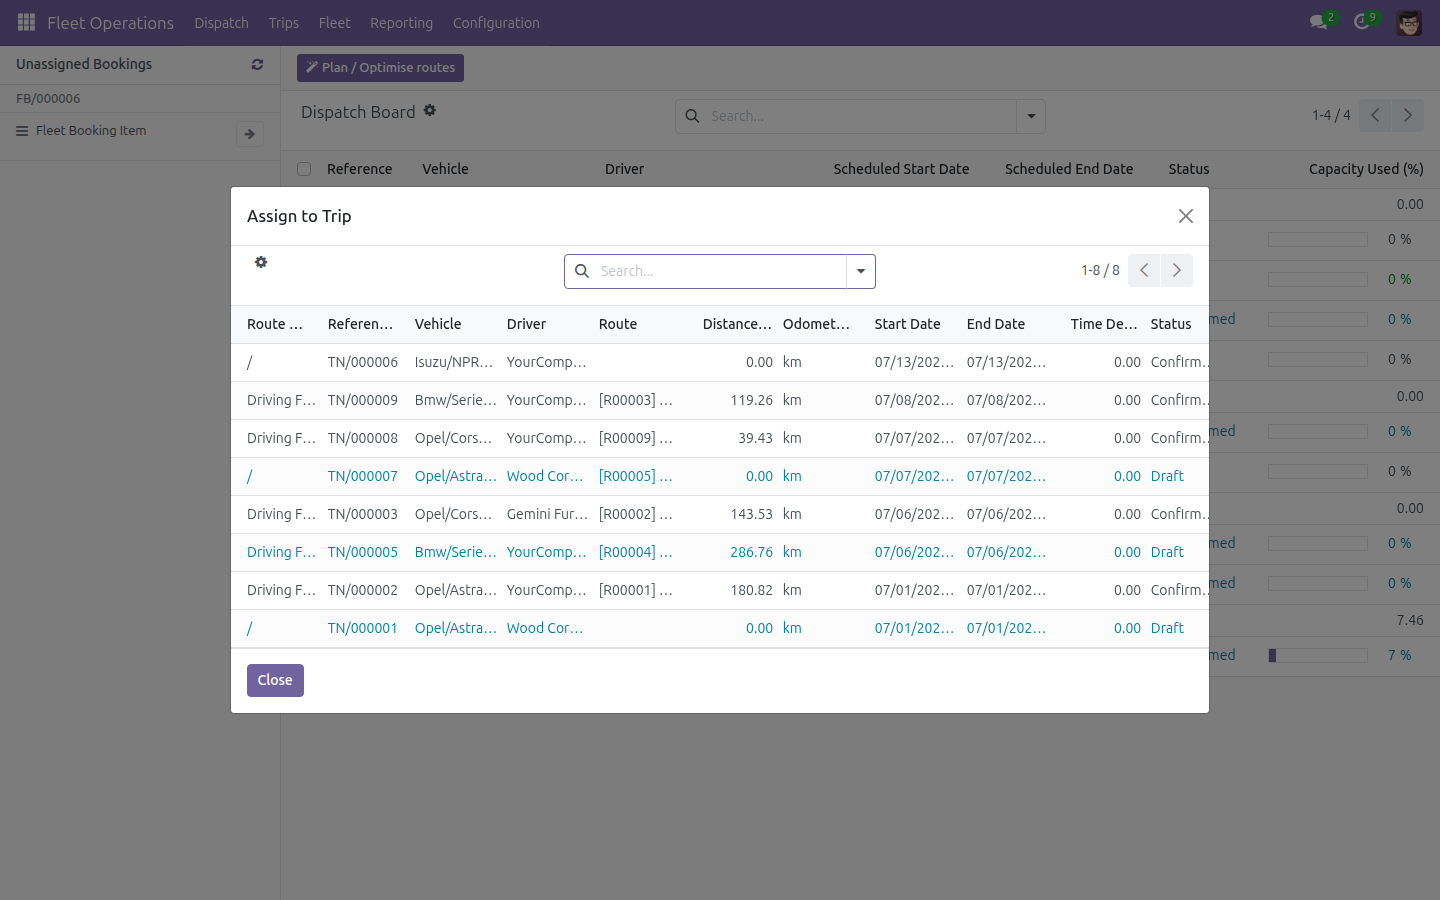
Assign a booking by hand
Assigning a single unassigned booking to an existing trip through the themed trip picker, a touch and keyboard alternative to drag-and-drop.
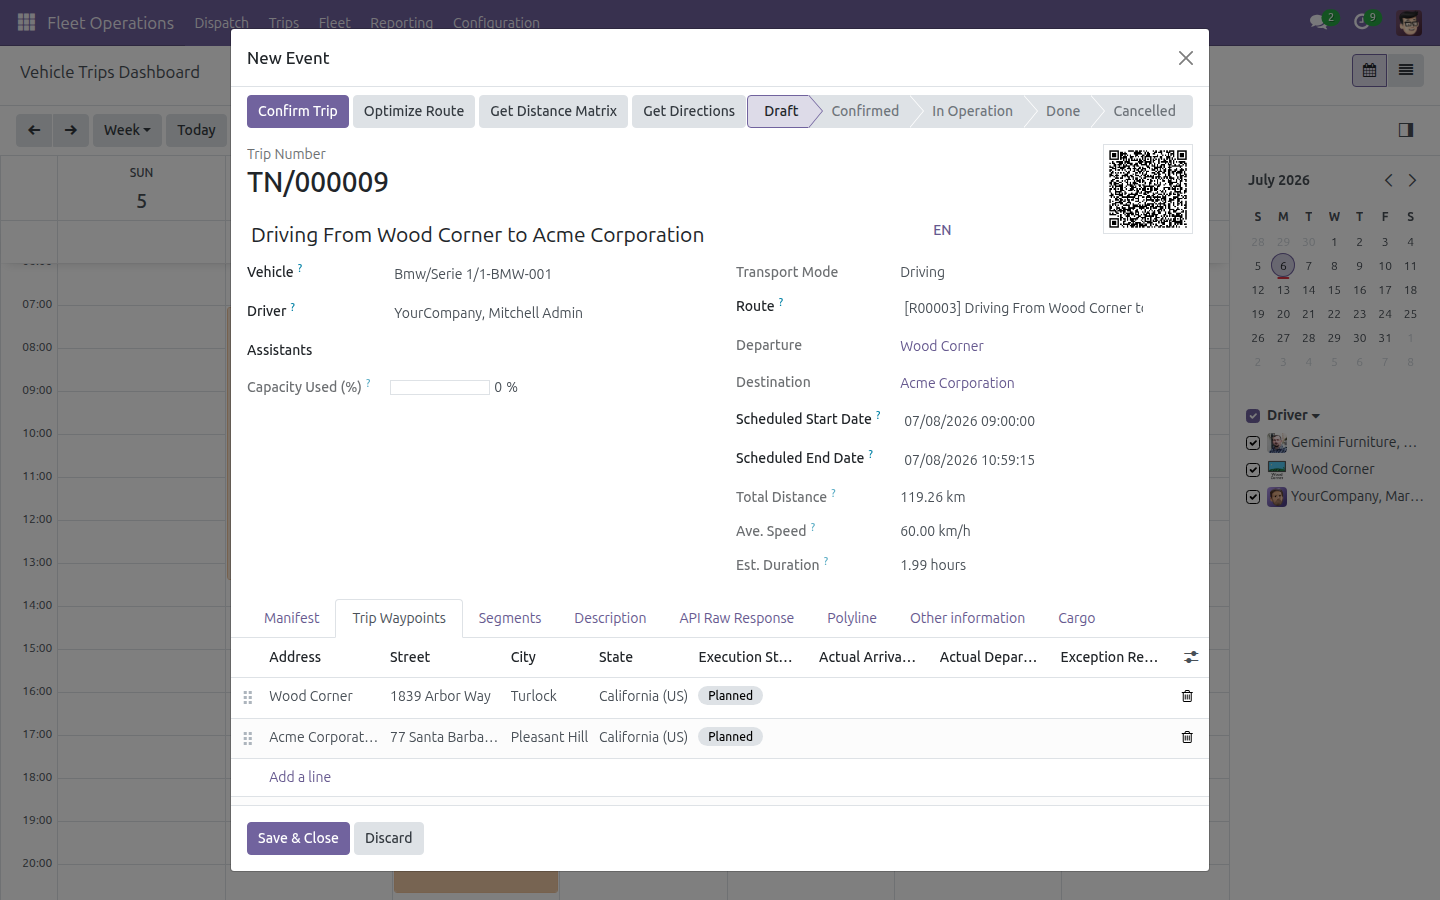
Plan a route-optimized trip
Planning a trip from the calendar: vehicle, driver, assistants and a Geo-Route, with Optimize Route computing per-stop ETA/ETD and per-segment distance.
Guide the driver stop by stop
The driver’s My Trips screen guiding one active stop with a single adaptive primary button, GPS stamped on every action.
Report a failed stop in one tap
The driver exception dialog with four big tap targets — Recipient absent, Refused, Closed, Other — to mark a stop Failed on the spot.
See Fleet Operations in Action
Watch the Dispatch Board auto-plan a route, then follow a driver through My Trips.
Need help with Fleet Operations?
Pre-Sales & Partnership
apps.support@viindoo.comTechnical Support
apps.support@viindoo.comTechnical Requirement
- Odoo version: 17.0
- Editions: Community / Enterprise
- Required modules: Fleet Booking & Trip Management, Viindoo Unified Routing Framework (Geo-Routes), Partner Working Calendar
- Additional dependency: Google OR-Tools (Python package, installed automatically) powers the route-optimization engine
- License: OPL-1
Who Should Use This Module?
Fleet Operations Manager / Dispatcher
Auto-plans and assigns bookings on the Dispatch Board, reviews optimizer proposals, and manages the Confirmed, In Operation and Done trip worklists.
Driver
Runs their assigned trip stop by stop from the mobile My Trips screen and reports exceptions in one tap.
Fleet Manager / Analyst
Configures per-vehicle VRP rules and reusable routes, and analyzes planned-vs-actual distance, time deviation and cost by route in the reporting pivots.
Ready to give your dispatch desk a real cockpit?
Install Fleet Operations and turn unassigned bookings into optimized, trackable trips today.
Viindoo — Powering Your Business Growth.
Fleet Operations
Note
Extends viin_fleet_booking (Fleet Booking & Trip Management) - see its documentation.
Fleet Operations turns your Fleet Booking data into a real dispatch cockpit: a drag-and-drop board that auto-plans vehicle routes with an OR-Tools-based solver, a keyboard/touch-friendly manual assignment flow, live route optimization on the trip form, and a mobile-first My Trips screen so drivers can execute their stops - and report problems - from their phone.
Installation
- Open Apps.
- Search for Fleet Operations (technical name viin_fleet_planning).
- Click Install.
Odoo installs the required apps automatically together with Fleet Operations:
- Fleet Booking & Trip Management - bookings, drivers and the base vehicle trip document.
- Viindoo Unified Routing Framework - reusable Routes, Waypoints and Route Sections.
- Partner Working Calendar - working-hours calendars used by the auto-planner.
Once installed, a new Fleet Operations app tile appears alongside the existing Fleet Booking tile, and drivers get a dedicated My Trips tile.
Configuration
Access rights
Assign each user one role from Settings > Users, under the Fleet category:
- Fleet Driver (Execution) - a field driver who only sees and executes their own assigned trips from My Trips.
- Fleet Planning Operator - plans and dispatches trips across the whole fleet (Dispatch board, Trips, Fleet, day-to-day bookings).
- Fleet Planning Administrator - full access to the whole Fleet Operations app, including Configuration and Reporting.
Master data
- Vehicles - Fleet Operations > Fleet > Fleet. On each vehicle you may want to set the Warning Volume, Max. Volume, Warning Payload and Max. Payload so the dispatch board's capacity bars are meaningful.
- Drivers - Fleet Operations > Fleet > Drivers, and their licenses under Drivers > Licenses.
- Routes & Waypoints - Fleet Operations > Configuration > Routes & Waypoints. Set up your common origin/destination pairs here so they can be picked from the Route field on a trip.
Vehicle routing settings
The auto-planner needs a few settings on every vehicle it may assign work to. Open Fleet Operations > Fleet > Fleet, select a vehicle, and fill in the VRP / Routing section (on the Model tab):

- Route End Depot - the address the vehicle returns to at the end of its route.
- Working Schedule - the working-hours calendar the vehicle (and its driver) follows.
- Max. Route Duration - the longest a single route may run.
- Default Service Time - the time spent at each stop when no other value is set.
A vehicle without these settings, or whose own address has no map coordinates, is skipped by the auto-planner.
Usage
Plan a route-optimized trip
Use this when you already know the vehicle, driver and route and just want the trip's stops and distances filled in automatically.
Go to Fleet Operations > Trips > Planning and click an empty slot on the calendar (or New) to open a blank trip.
Fill in Vehicle and Driver. Add one or more Assistants if needed.
Select a Route - the list only shows routes that match the vehicle's transport mode.
Click Optimize Route to rebuild the trip's stops from the selected route's addresses.
Click Get Distance Matrix to fetch distance/duration between the stops.
Click Get Directions to fetch the turn-by-turn route and refresh the average speed and estimated duration.

Click Confirm Trip. The trip moves to Confirmed and appears under Fleet Operations > Trips > Trips Confirmed.

Auto-plan bookings on the Dispatch Board
Use the Dispatch Board to let the route-optimization engine propose vehicle assignments for every booking that has not been assigned to a trip yet.
Go to Fleet Operations > Dispatch. The Unassigned Bookings panel lists booking items waiting to be planned; the trip list on the right is grouped by vehicle.

Click Plan / Optimise routes in the toolbar. The engine reviews every vehicle configured for routing (see Configuration above) and every unassigned booking, then opens a Route optimisation review dialog listing one proposed route per vehicle, with distance, duration and load-utilisation bars, plus a Could not be planned section for any booking it could not fit anywhere.
Review the proposal, then click Accept all to create or update a trip per vehicle and assign the booking items in one action - or click Fix next to an unplaced item to assign it yourself.
The dialog closes and the board refreshes: assigned bookings disappear from Unassigned Bookings and each affected vehicle's capacity bar updates.
Note
The auto-planner only proposes a route when it can find at least one vehicle whose Route End Depot, Working Schedule and own address all have map coordinates, and whose free time overlaps the booking's pickup/drop-off window. See Troubleshooting below if a booking keeps landing in Could not be planned.
Manually assign a booking to a trip
Use this to assign one booking item yourself - useful on a touchscreen, with the keyboard, or when you want a specific vehicle rather than the auto-planner's suggestion.
Go to Fleet Operations > Dispatch.
On the booking card in Unassigned Bookings, click the Assign to trip button (the arrow icon) - a keyboard/touch-friendly alternative to dragging the card onto a trip row.

Click the row of the trip you want to assign the booking to. The dialog closes immediately and the booking is linked to that trip.
The card disappears from Unassigned Bookings and now shows up among that vehicle's assigned bookings, with the trip's capacity bar updated.

Note
Only the trip's own driver, or a Fleet Planning Administrator, can add stops to a confirmed trip. If you dispatch on behalf of a colleague, ask them (or an administrator) to confirm the assignment, or set yourself as the trip's driver before assigning bookings to it.
Execute a trip as a driver (My Trips)
Drivers use My Trips - a single mobile-first screen with no other menu - to work through their assigned trip stop by stop.
Open My Trips. Your currently assigned trip (Confirmed or already In Progress) loads automatically.

Click Start trip. The trip moves to In Progress and the ordered list of stops appears, with one primary button on the current stop.

At each stop, click Navigate to open the address in Google Maps, then work through the button that appears for that stop: Arrived, then Loaded (pickup stop) or Delivered (drop-off stop), then Depart. Every tap stamps the time (and GPS position, when available) on that stop.
Once every stop is terminal (departed or reported as failed), click Finish trip.

You return to the empty My Trips screen ("No assigned trips right now.") and the trip's actual arrival/departure times are all recorded.

Report a problem at a stop
Use this when a stop cannot be completed as planned - for example the recipient is not there.
On the active stop card in My Trips, click Report problem.

Tap the matching reason - Recipient absent, Refused, Closed or Other - and optionally add a short note.
The stop is marked Failed with the reason shown next to it, and the next stop (or Finish trip, if it was the last one) becomes active.

Start and end a trip from the trip form
You can also drive a trip from the back office instead of (or in addition to) My Trips:
- Go to Fleet Operations > Trips > Trips Confirmed, open the trip, and click Start. The Trip Starting Wizard lets you confirm or change the Driver, Assistants, Odometer, Start time and Vehicle before the trip moves to in operation.
- While the trip is running, go to Fleet Operations > Trips > Trips in Operation, open the trip and click Register Cost to record a cost through the Trip Cost Registration Wizard (Date, Amount, Cost Type, and the Trip Waypoint or Trip Section the cost belongs to).
- To close the trip, open it from Trips in Operation and click Done. The Trip Ending Wizard records the End Time, Odometer and Fuel Consumption.
Troubleshooting
A booking keeps landing in "Could not be planned" after Plan / Optimise routes. Check that: the booking's pickup and drop-off addresses have map coordinates; at least one vehicle has its Route End Depot and Working Schedule filled in and its own address is geocoded; and the booking's pickup/drop-off time falls inside a vehicle's working hours.
I assigned a booking to a trip, but nothing changed on the board. Only the trip's own driver or a Fleet Planning Administrator can add stops to that trip. If you dispatch trips that are not driven by you, ask an administrator to make the assignment, or have them add you as the trip's driver first.
The Route field on a trip shows no matches for a route I know exists. The Route field only lists routes whose transport mode matches the vehicle's own transport mode (Driving, Truck, Waterway, and so on). Change the vehicle or create a route for that mode.
My Trips shows "GPS unavailable - used planned address." The browser/device did not provide a GPS location for that stamp, so the stop's planned address was recorded instead. Location permission can be granted from the device settings for next time.
FAQ
Does clicking "Accept all" overwrite trips I already confirmed by hand? No. The auto-planner only proposes new assignments for bookings that are not yet linked to a trip; it reviews the proposal with you before anything is written.
What route-optimization engine does the Dispatch Board use? A server-side Google OR-Tools vehicle-routing solver, run over the vehicles and bookings you configure - no external mapping subscription is required for the solve itself.
Can a driver see other drivers' trips in My Trips? No. My Trips only ever shows the confirmed or in-progress trip currently assigned to the logged-in driver.
Can I still register a cost against a specific stop or route section? Yes - the Register Cost wizard, opened from a trip in operation, lets you pick the exact Trip Waypoint or Trip Section the cost belongs to.
Instruction video
This software and associated files (the "Software") may only be used (executed, modified, executed after modifications) if you have purchased a valid license from the authors, typically via Odoo Apps, or if you have received a written agreement from the authors of the Software (see the COPYRIGHT file).
You may develop Odoo modules that use the Software as a library (typically by depending on it, importing it and using its resources), but without copying any source code or material from the Software. You may distribute those modules under the license of your choice, provided that this license is compatible with the terms of the Odoo Proprietary License (For example: LGPL, MIT, or proprietary licenses similar to this one).
It is forbidden to publish, distribute, sublicense, or sell copies of the Software or modified copies of the Software.
The above copyright notice and this permission notice must be included in all copies or substantial portions of the Software.
THE SOFTWARE IS PROVIDED "AS IS", WITHOUT WARRANTY OF ANY KIND, EXPRESS OR IMPLIED, INCLUDING BUT NOT LIMITED TO THE WARRANTIES OF MERCHANTABILITY, FITNESS FOR A PARTICULAR PURPOSE AND NONINFRINGEMENT. IN NO EVENT SHALL THE AUTHORS OR COPYRIGHT HOLDERS BE LIABLE FOR ANY CLAIM, DAMAGES OR OTHER LIABILITY, WHETHER IN AN ACTION OF CONTRACT, TORT OR OTHERWISE, ARISING FROM, OUT OF OR IN CONNECTION WITH THE SOFTWARE OR THE USE OR OTHER DEALINGS IN THE SOFTWARE.