Revenue and Operational Cost Management
Revenue and operational cost management is vital in ensuring a business’s financial sustainability and efficiency. By closely monitoring income and expenses, companies can identify opportunities to optimize profits, minimize waste, and allocate resources effectively.
Requirements
This tutorial requires the installation of the following applications/modules:
Initial Configuration
To install the app, navigate to Viindoo Apps, remove the default filter and search for the to_fleet_accounting module then press Activate.

Revenue Management
Vehicle’s revenue management
Manage Contracts
The maintenance of vehicle contracts is crucial, as it serves as a repository for storing essential information, including general details and pricing, to support subsequent processes.
Navigate to Fleet > Configuration > Types, press New to create:
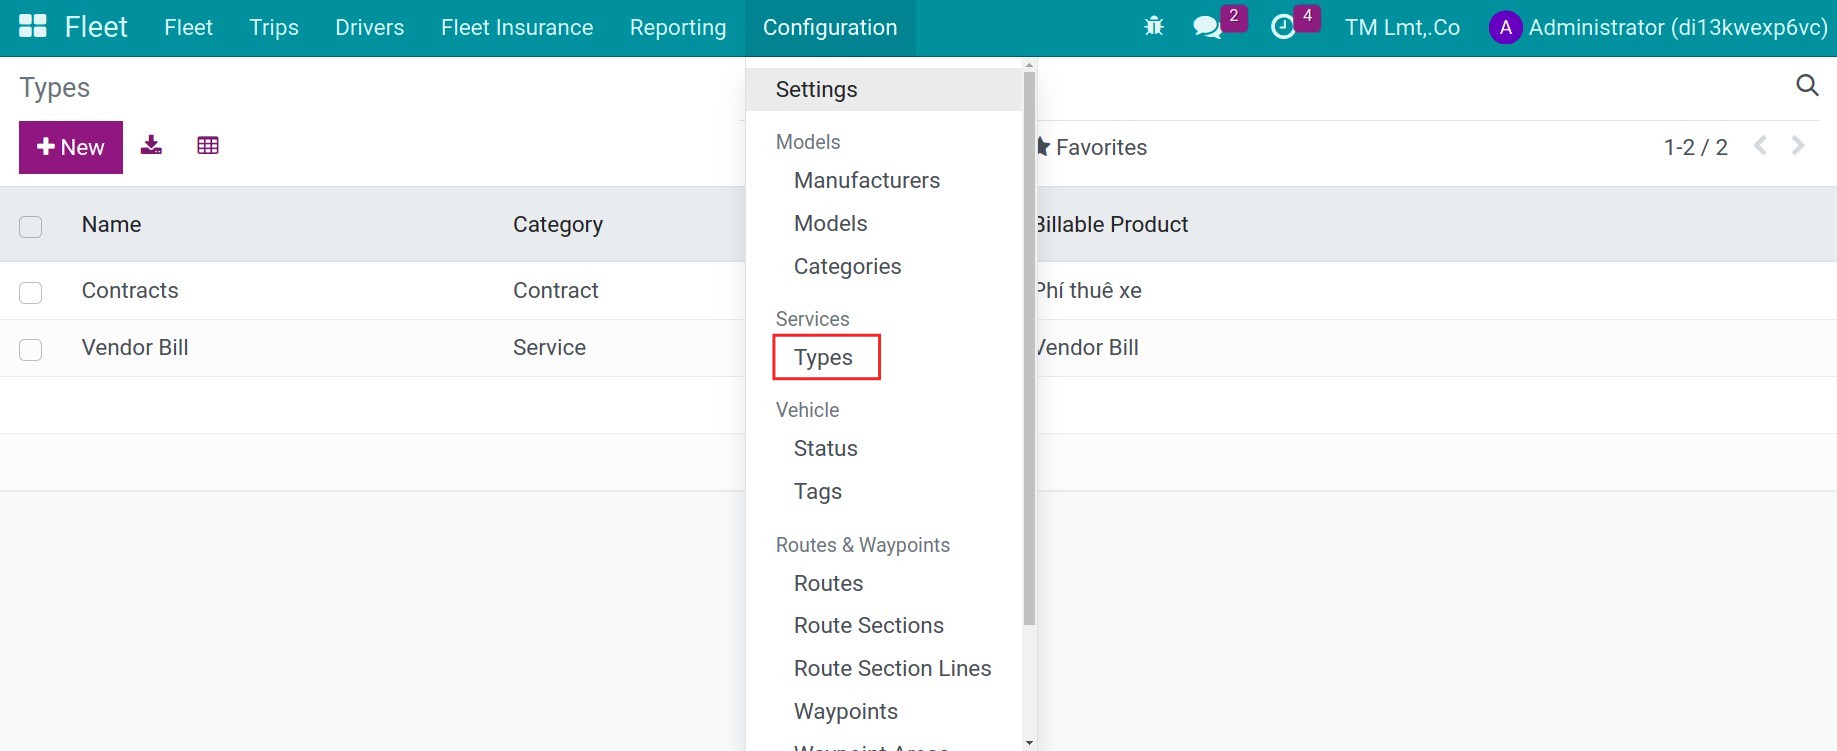
Name: Name of service’s types.
Category: Choose the corresponding category.
Billable Product: Choose the product for issuing vendor bill.
Navigate to Fleet > Fleet > Contracts, press New to create a new contract:

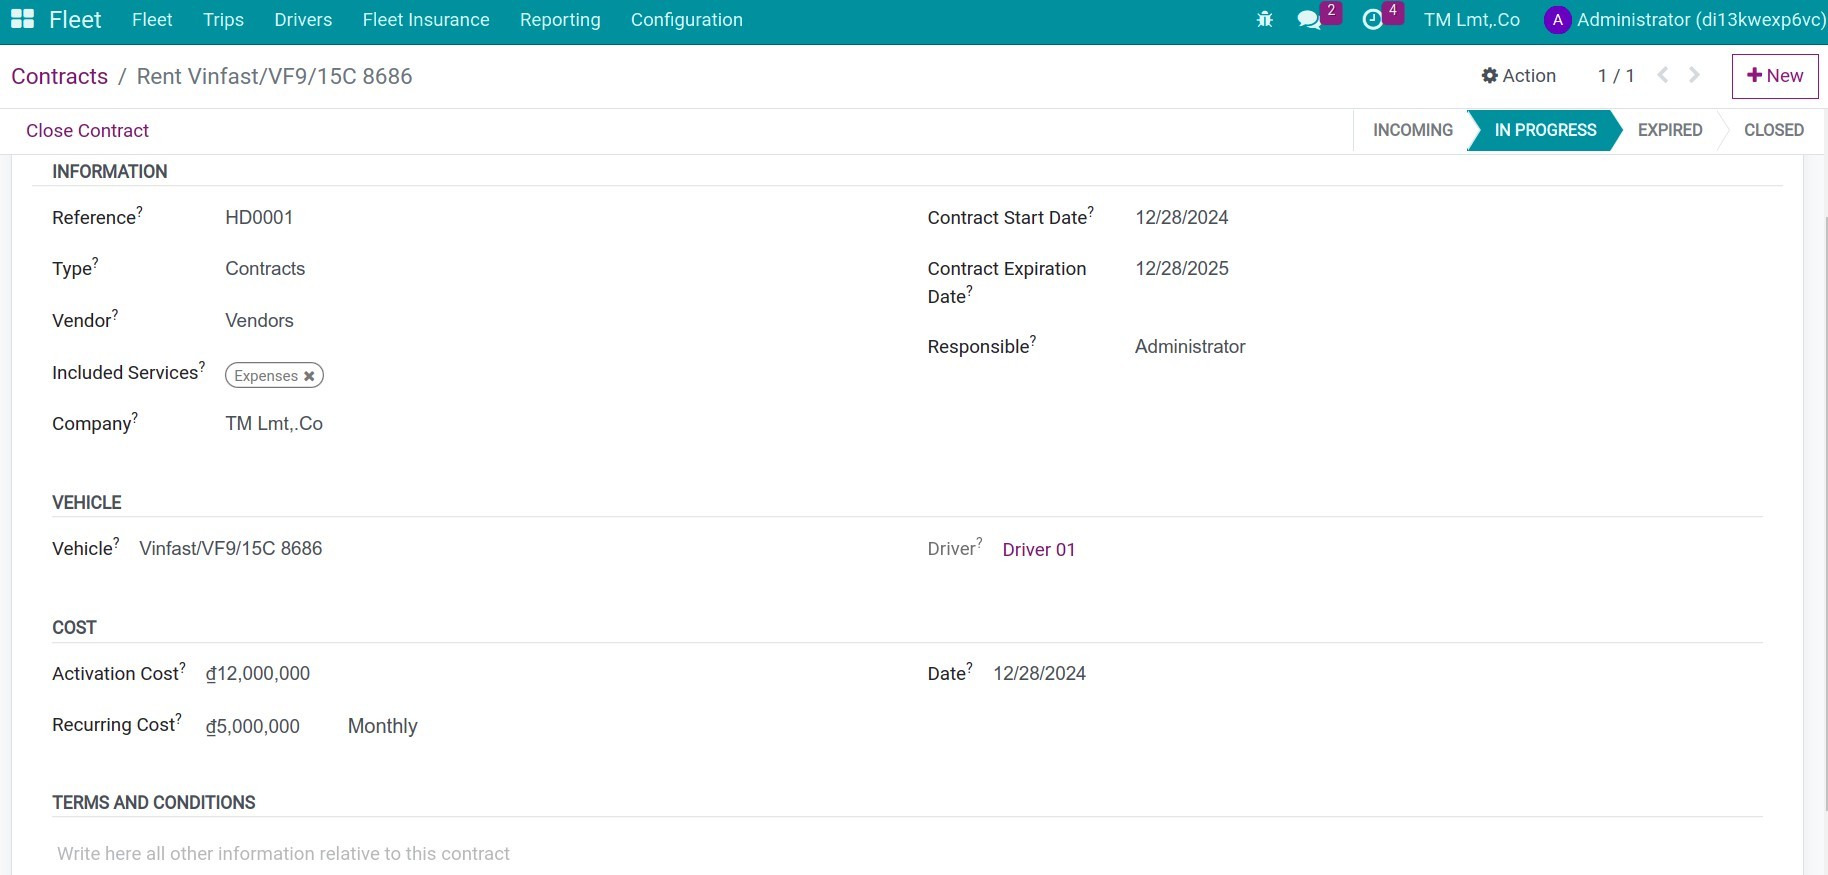
Information:
Reference: Input the reference code.
Type: Choose the corresponding type.
Vendors: Choose the vendor.
Included Services: This product will default to the relative type.
Contract Start Date: The start date of the contract.
Contract Expiration Date: The end date of the contract
Responsible: The user is responsible for this contract.
Vehicle:
Vehicle: Choose the vehicle.
Driver: The driver of the vehicle.
Cost:
Activation Cost: Cost is paid only once upon contract creation.
Recurring Cost: The recurring cost for each period.
Date: The date when the cost will be executed.
Terms and Conditions:
Here you can input more terms and conditions for the contracts.
Press the cloud icon to save.
Revenue recognition
Revenue recognition is not just a financial management process but also a strategic management tool that helps businesses ensure transparency and recognize revenue at the appropriate time, accurately reflecting the financial position and operational performance of the company. Depending on the regulations and the actual situation of the business, the party responsible for revenue recognition can be either accounting staff or employees directly involved in the execution.
The Accountant records revenue
Create a new invoice customer, on the invoice, choose the analytic account that is respective with the vehicle.
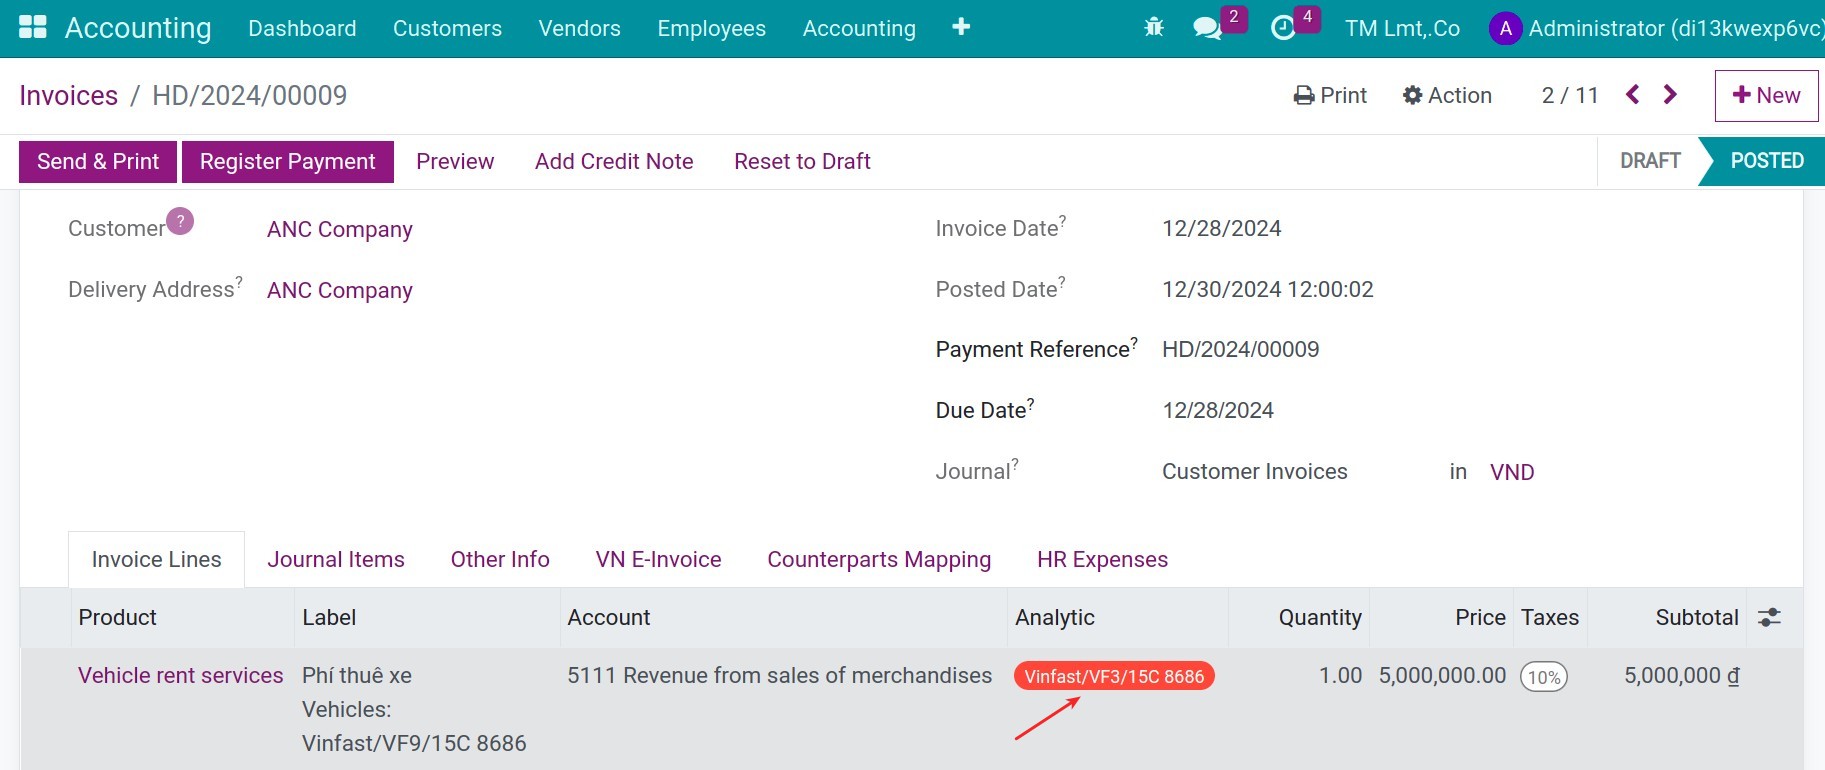
When you validate the invoices, a vehicle’s revenue will be created automatically.
Driver records revenue
Navigate to Fleet > Fleet > Revenues, press New to create a new contract:

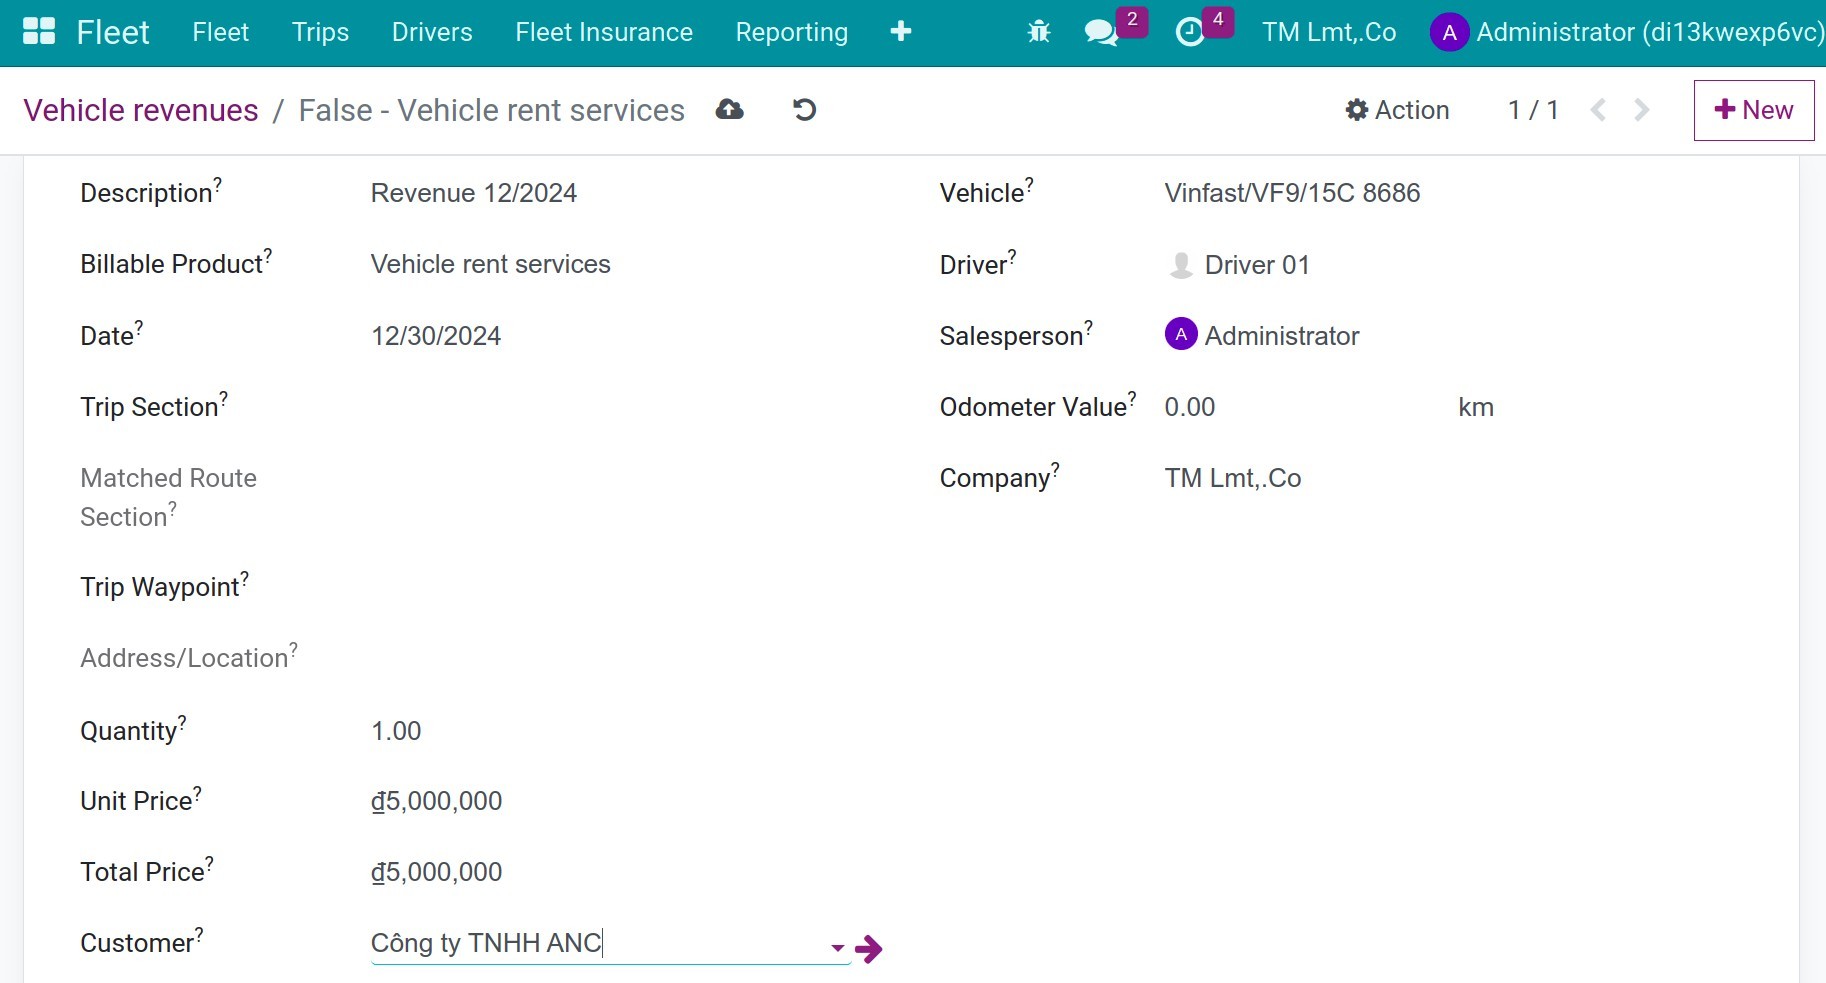
Description: Input the descriptions.
Billable product: Choose the respective product for billing.
Date: The date of this revenue.
Quantity: Input the quantity.
Unit Price: The unit prices for the vehicle’s revenue.
Total Price: The system will calculate automatically.
Customer: Choose the customer.
Vehicle: The vehicle that makes this revenue.
Driver: The respective driver.
Salesperson: The salesperson is responsible for this revenue.
Odometer Value: The recent odometer of the vehicle.
Save the revenue to the next step. After recording revenue, the accountant will press the Action button, press to Create Customer Invoices.
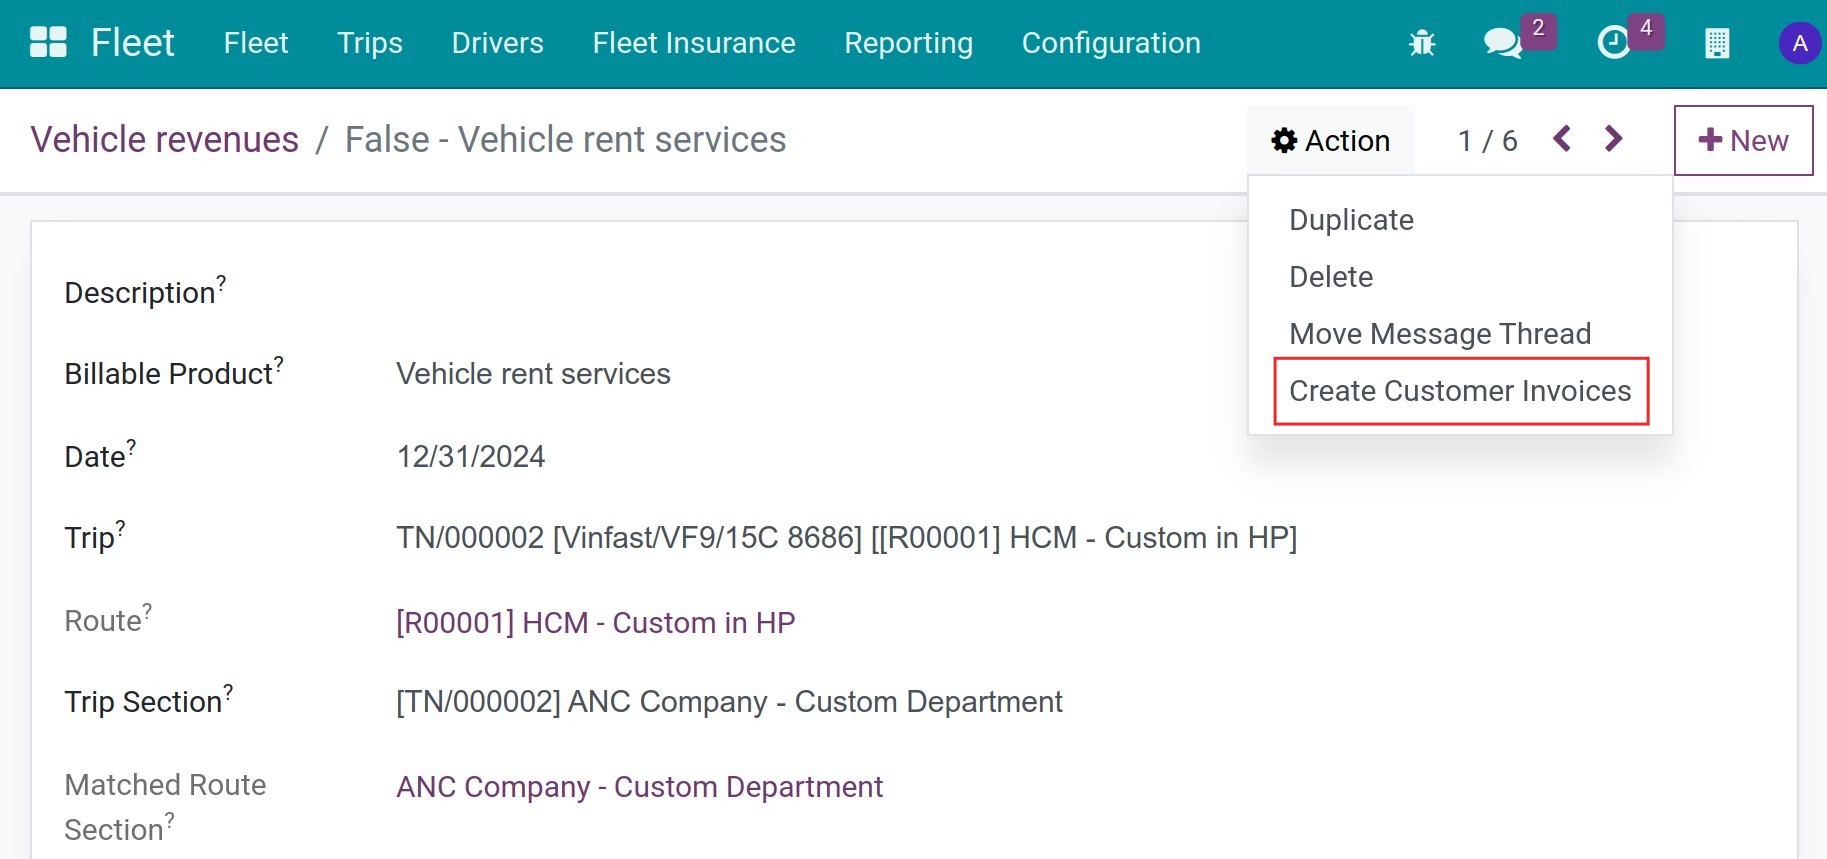
Or on the list view, choose the vehicle revenues and then press the Action button, press to Create Customer Invoices.

Input the information as below:
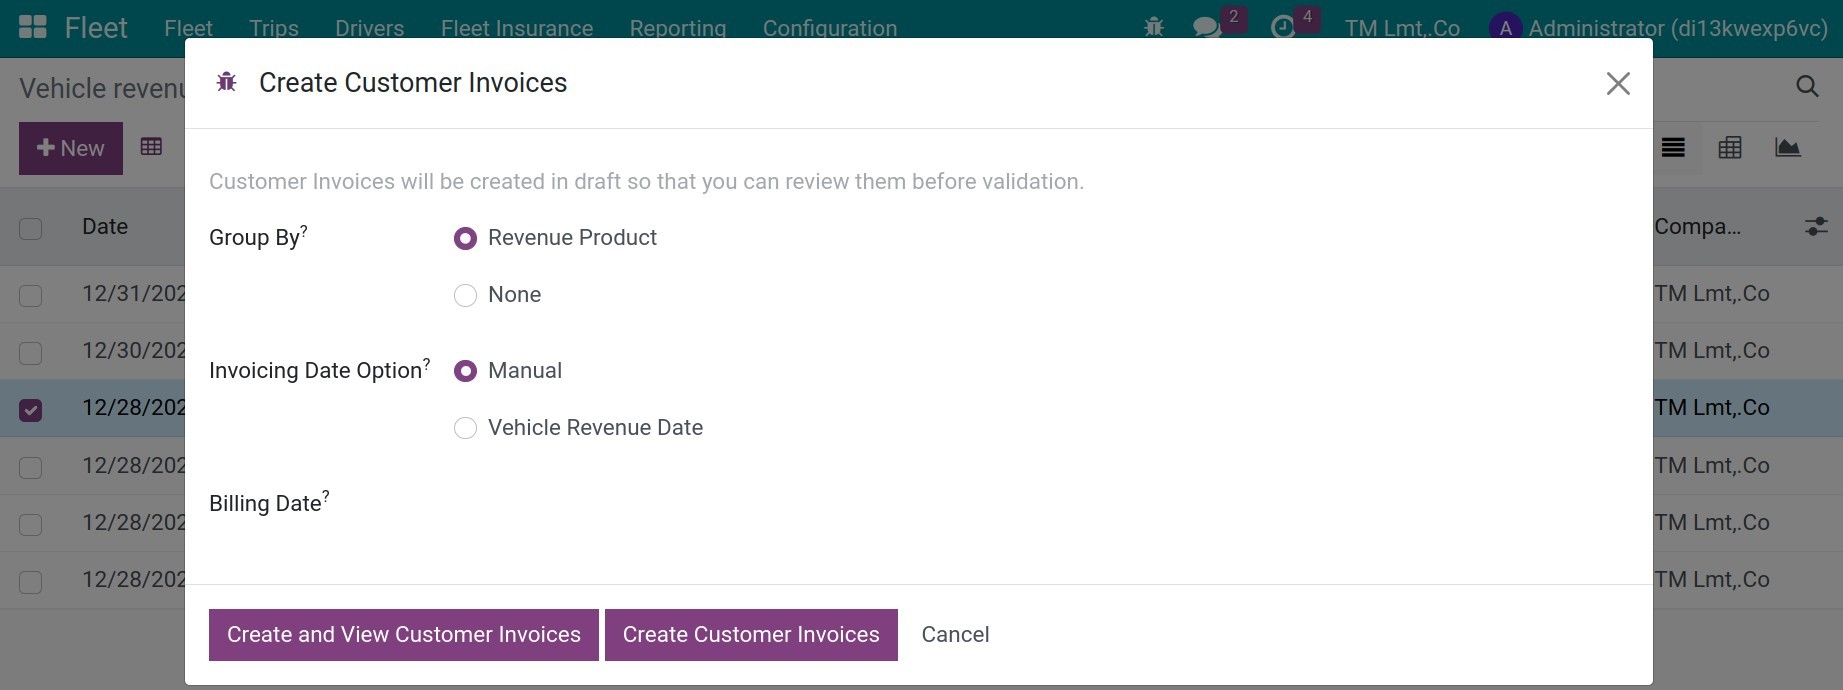
Group by:
Revenue Product: With this option, on the invoice, the invoice lines will be grouped by the invoiced revenue products.
None: With this option, on the invoice, the invoice lines will not be grouped by.
Invoicing Date Option:
Manual: User can input the invoicing date manually on the below Billing Date field.
Vehicle Revenue Date: The invoicing date will be defaulted from the vehicle revenue date.
Press Create and View Customer Invoices.

The system will create one analytic account automatically that is respective to each vehicle. Then the analytic account will be assigned whenever one invoice is generated for each vehicle. The analytic account is the tool to gather the vehicle’s revenue.
Trip’s revenue management
Refer to the article Schedule and Planning Vehicle Management to create a trip. On each trip, press to button Record Revenue, you can create a revenue for it.

Customer: Choose the customer on the list.
Date: The date of the revenue.
Billing Product: Choose the product to issue an invoice.
Unit Price: The unit price.
Quantity: The quantity of the trip.
Amount: The amount which is calculated automatically.
Trip Waypoint: The waypoint of the trip for where the revenue is registered.
Trip Section: The section of the trip for which the revenue is registered.
Odometer Value: Odometer measure of the vehicle at the moment of this log.
Press the button Create to finish. After registering the revenue, you need to create the customer invoices to post the revenue and record the customer debts. Press the Action menu, press to Invoice Trips’ Revenues.

On the invoices, you will see the anylytic account of the vehicle assigned to gather the vehicle’s revenue.
Operation Cost Management
Vehicle’s cost management
Costs declaration
The accountant records cost
Create a new vendor bill. Choose the analytic account that is associated with the vehicle on the bill.
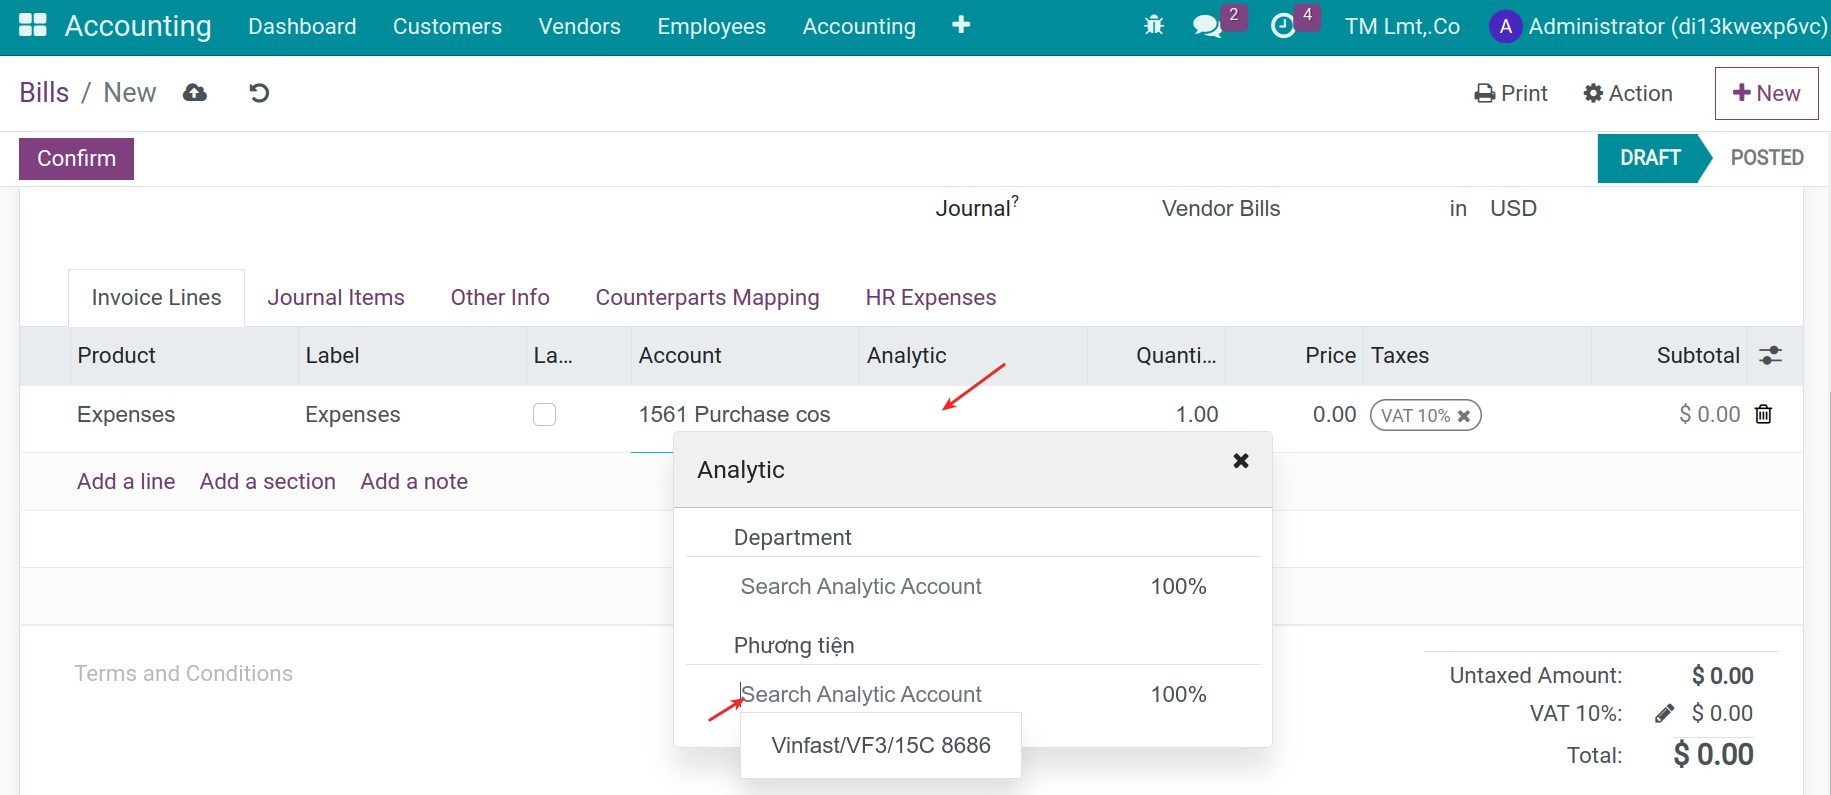
When you validate the bill, a vehicle’s service will be created automatically.
Drivers record cost
Navigate to Fleet > Fleet > Services, press New to create a new service:

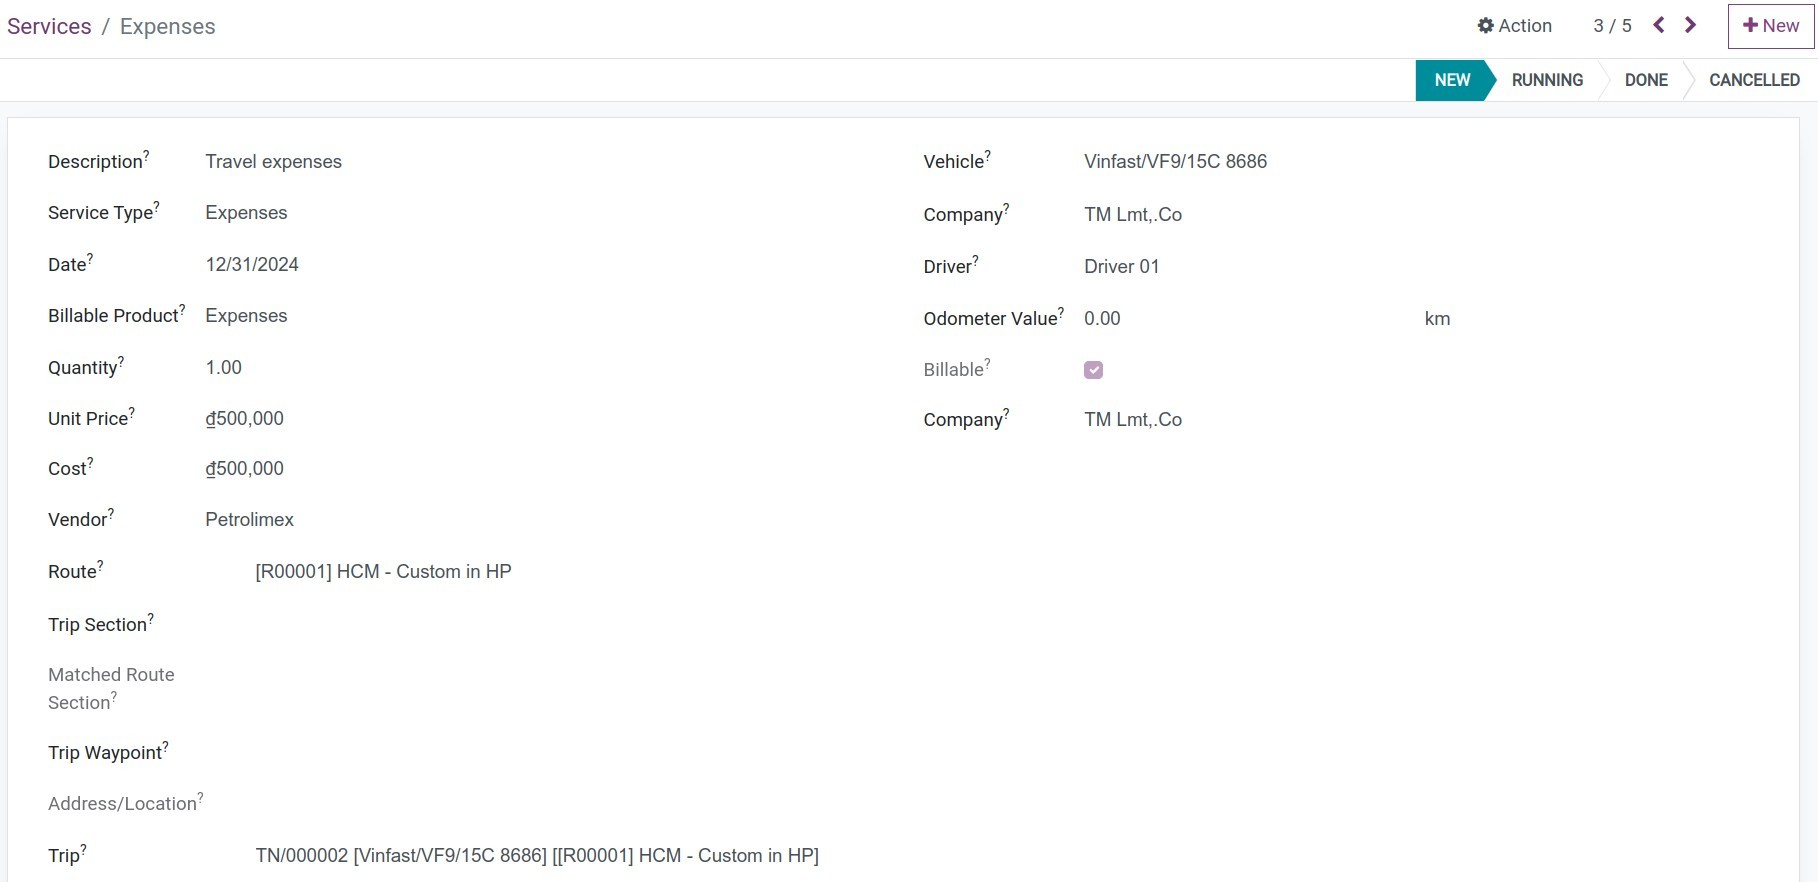
Description: Describe the expenses.
Service Type: Choose the service type.
Date: The date of the expense.
Billable Product: Choose the product to issue a bill.
Quantity: The quantity of the expense.
Unit Price: The price of the expense.
Cost: The cost will be calculated automatically.
Vendor: Choose the vendor on the list.
Route: Choose the respective route.
Trip: Choose the trip.
Vehicle: Choose the vehicle.
Driver: The driver of the vehicle.
Odometer Value: Input the vehicle’s odometer.
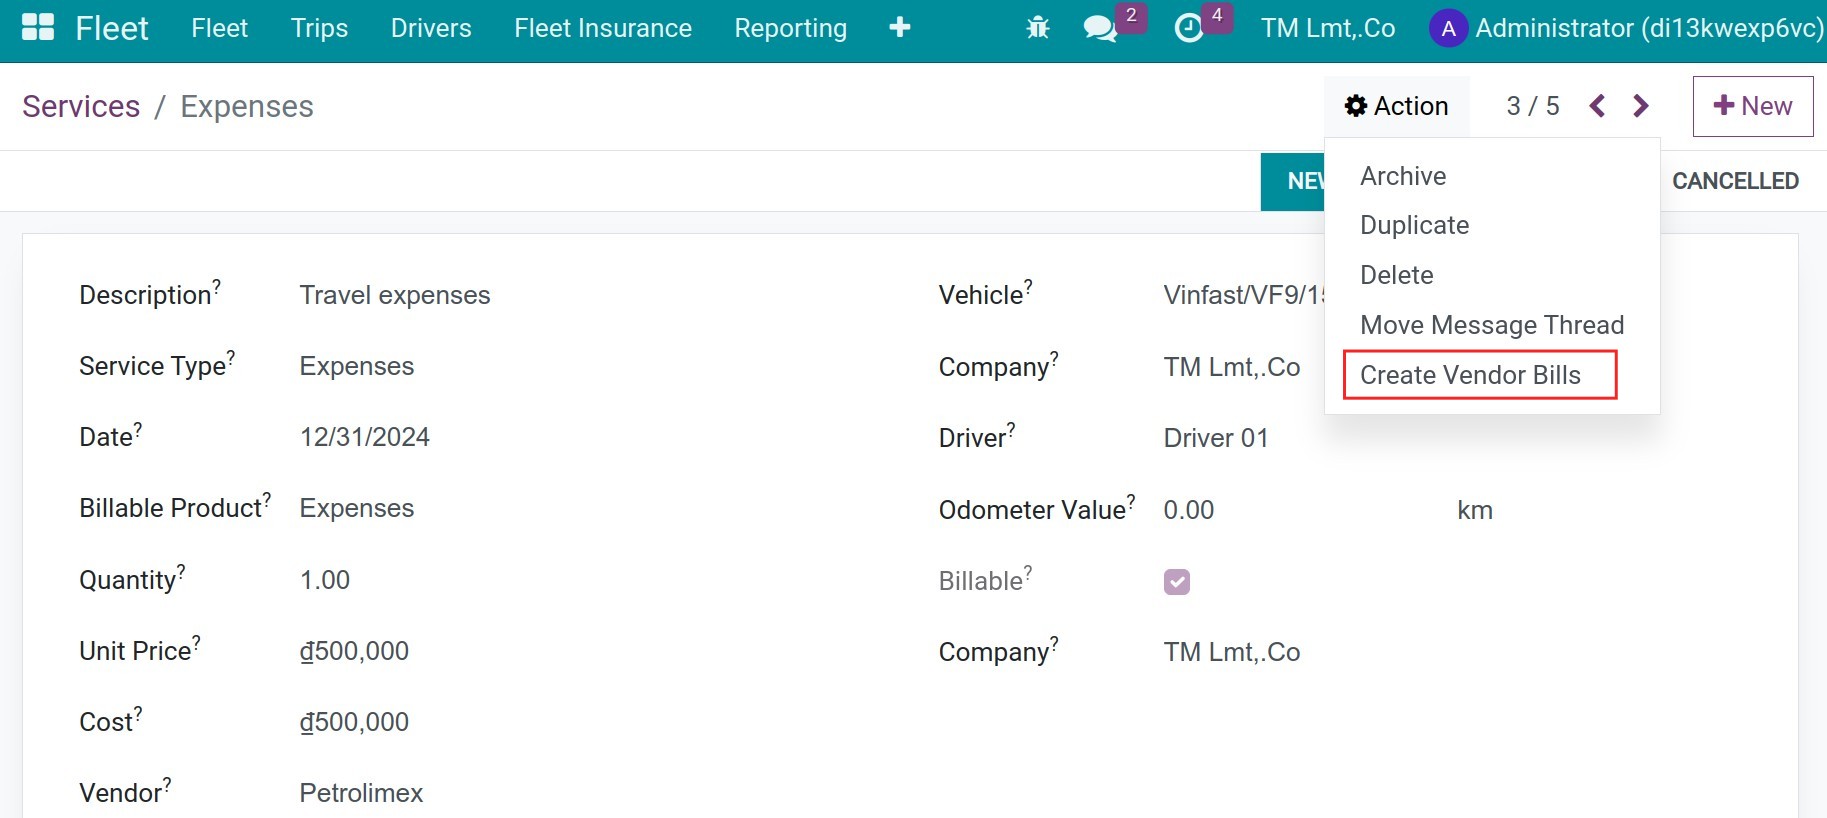
Save the service to the next step. Press the Action menu, press to Create Vendor Bills.
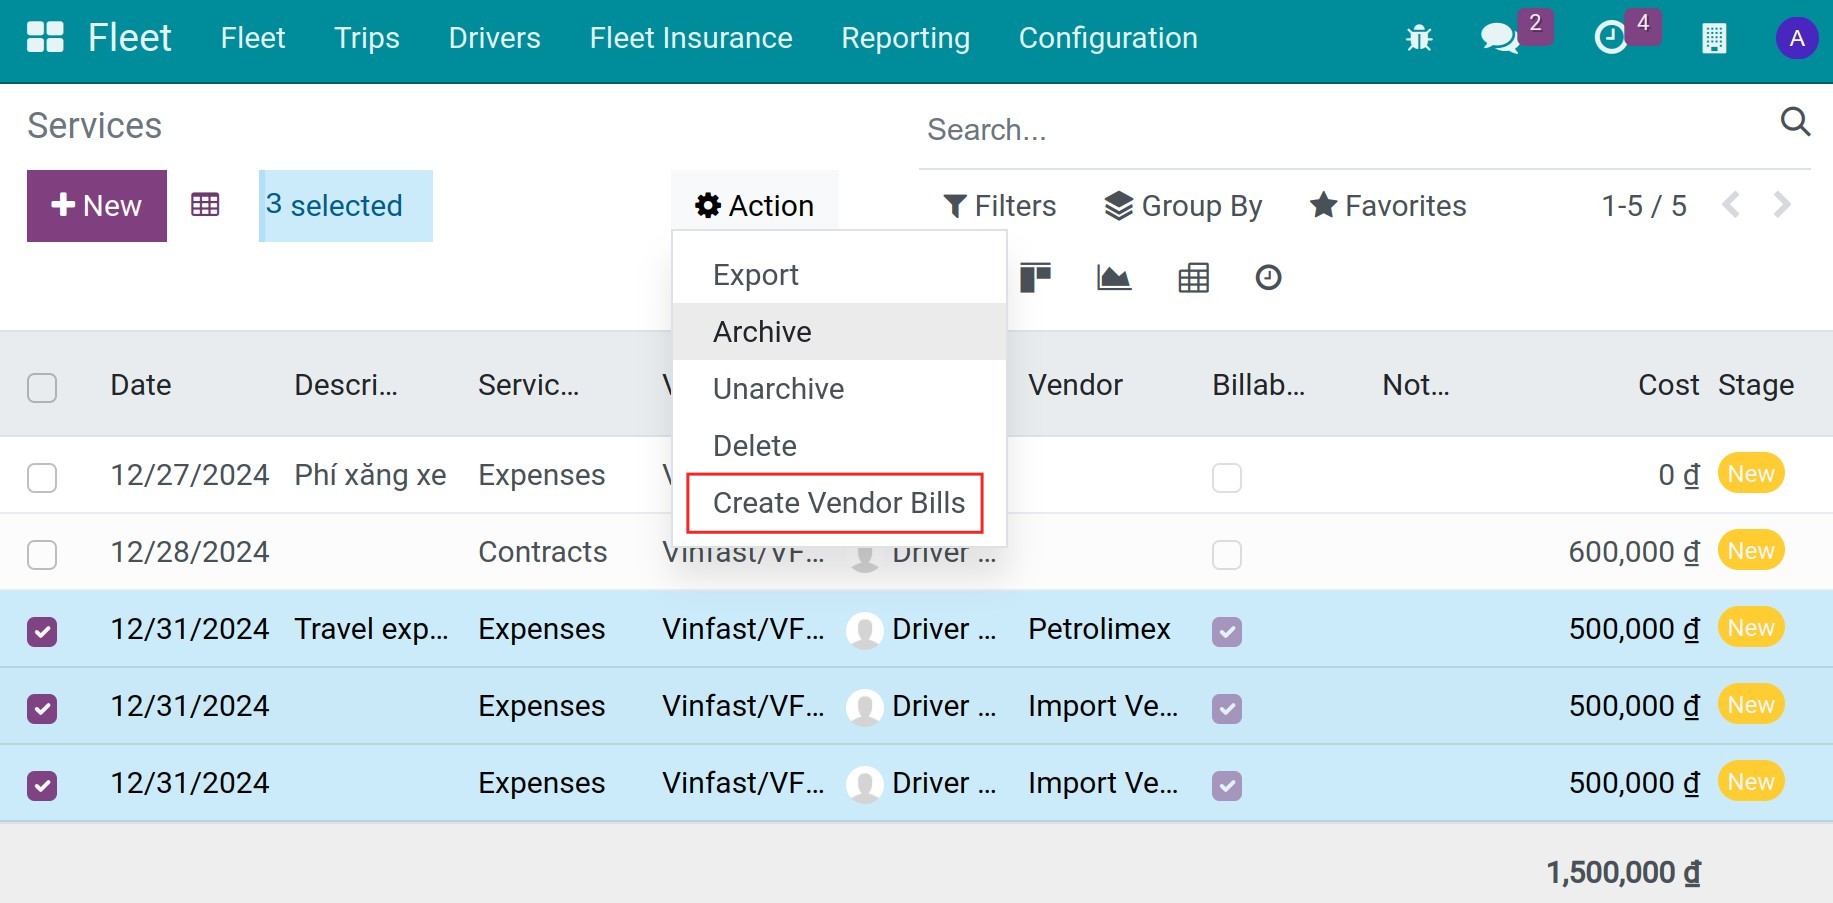
Or on the list view, choose the vehicle costs and then press the Action button, press to Create Vendor Bills.
Input the information as below:
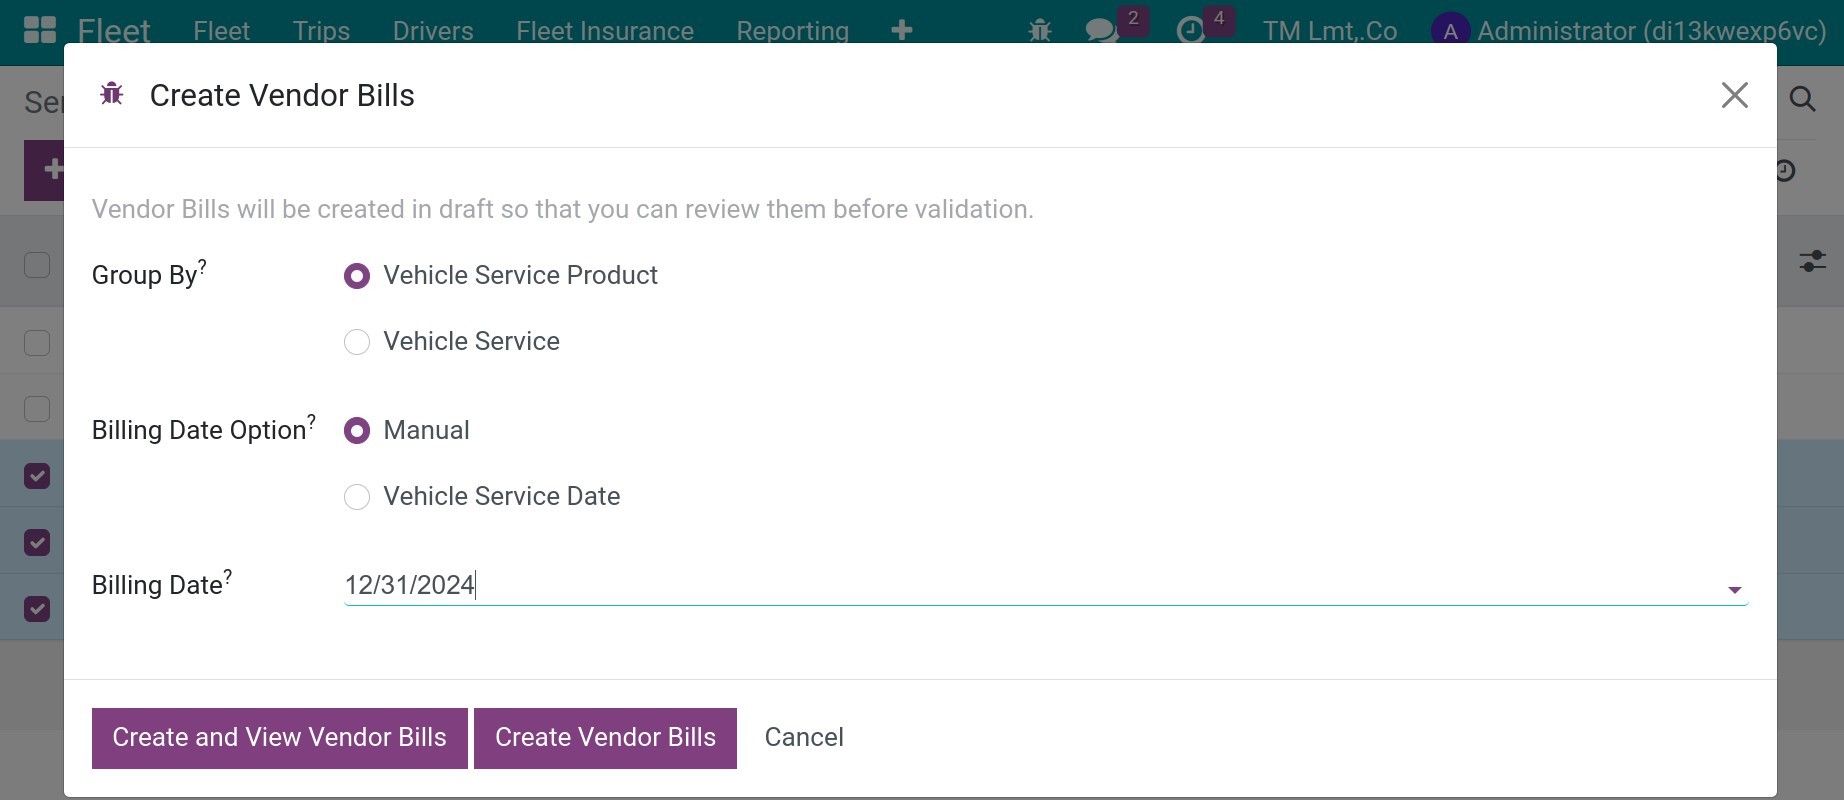
Group by:
Vehicle Service Product: With this option, on the bill, the bill lines will be grouped by the vehicle service products.
Vehicle Service: With this option, on the bill, the bill lines will be grouped by the vehicle service.
Invoicing Date Option:
Manual: User can input the billing date manually on the below Billing Date field.
Vehicle Service Date: The billing date will be defaulted from the vehicle service date.
Press Create and View Vendor Bills.
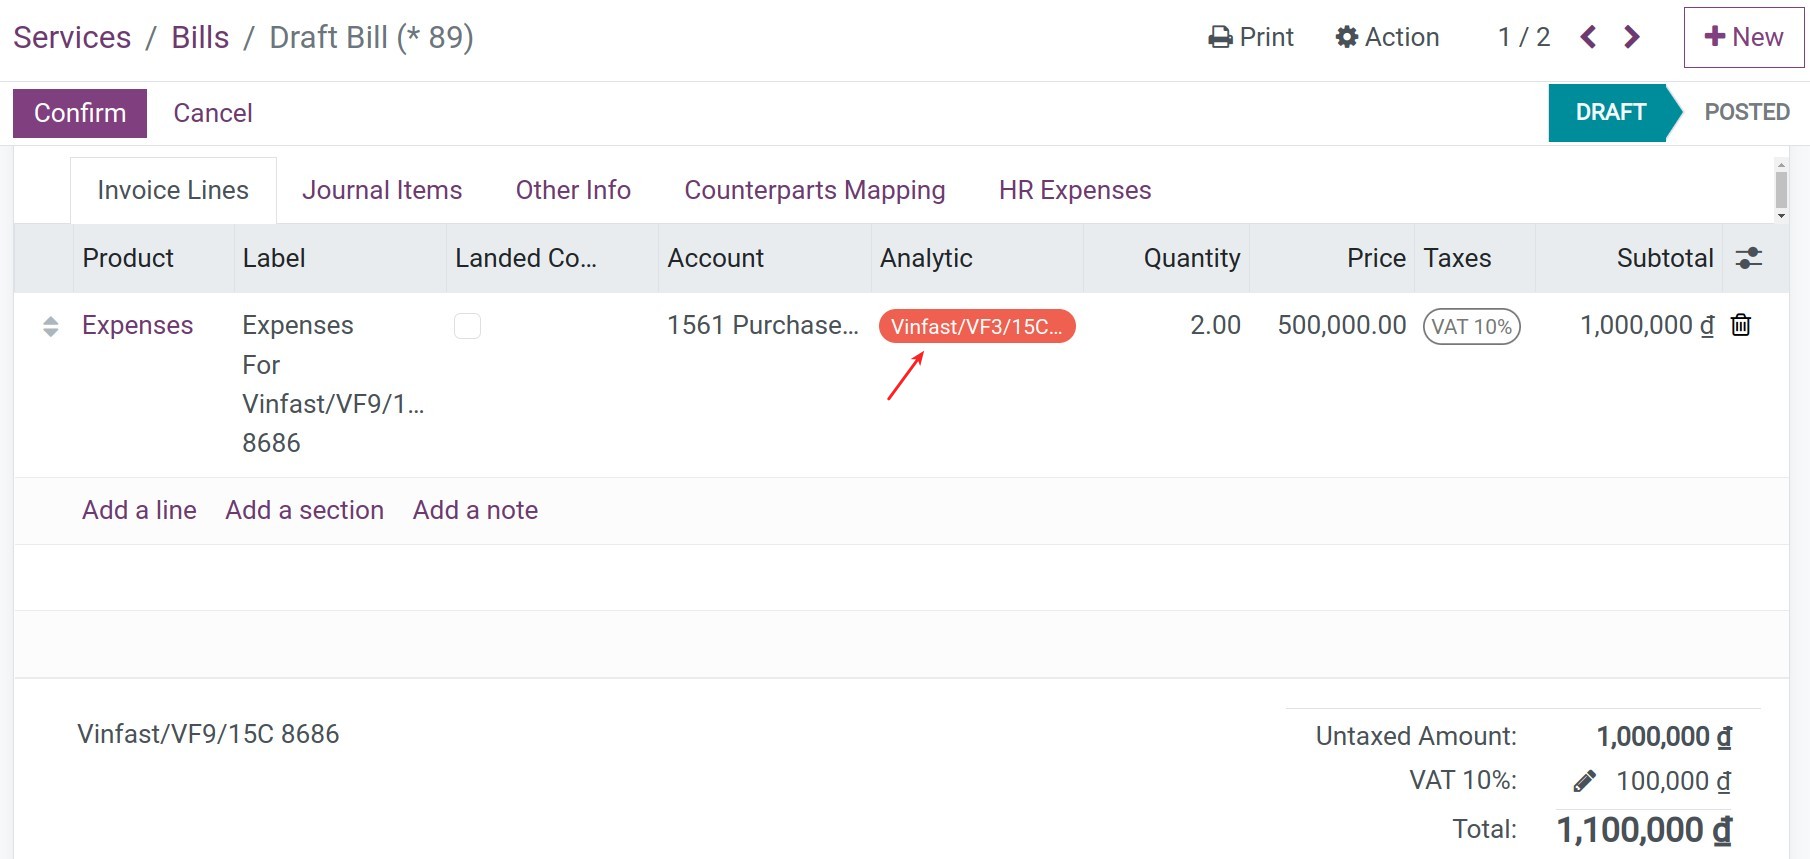
The system will automatically create one analytic account respective to each vehicle. Then the analytic account will be assigned whenever one bill is generated for each vehicle. The analytic account is the tool to gather the vehicle’s cost.
Trip’s cost management
Refer to the article Schedule and Planning Vehicle Management to create a trip. On each trip, press to button Log Service, you can create a cost for it.
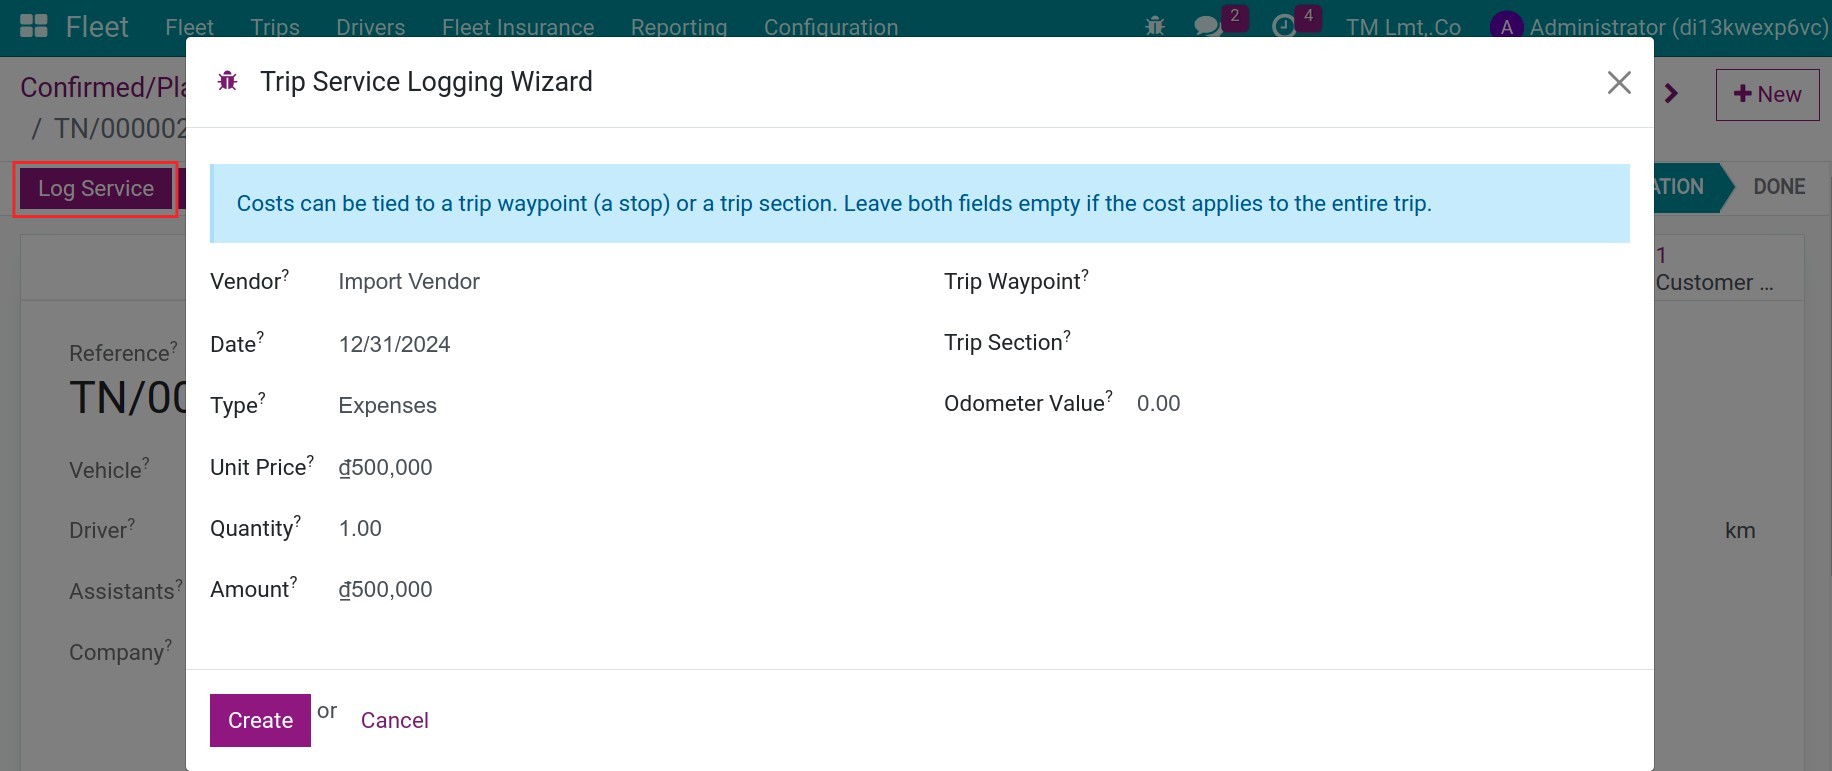
Vendor: Choose the customer on the list.
Date: The date of the revenue.
Type: Choose the product to issue an invoice.
Unit Price: The unit price.
Quantity: The quantity of the trip.
Amount: The amount which is calculated automatically.
Trip Waypoint: The waypoint of the trip for where the revenue is registered.
Trip Section: The section of the trip for which the revenue is registered.
Odometer Value: Odometer measure of the vehicle at the moment of this log.
Press the smart button Services, choose the expense, and then press the Action > Create Vendor Bills.


On the bills, you will see the anylytic account of the vehicle assigned to gather the vehicle’s cost.
See also
Related article
Optional module